Linking your work Corporate Email Address to your existing Gmail account is a straightforward task, thanks to the user-friendly settings section in Gmail. After a successful Gmail link, your corporate your emails will now route through your Gmail account and will be flagged as originating from your corporate email address. You will also have the ability to reply using the corporate email, your recipients will not be aware that the email was sent via Gmail.
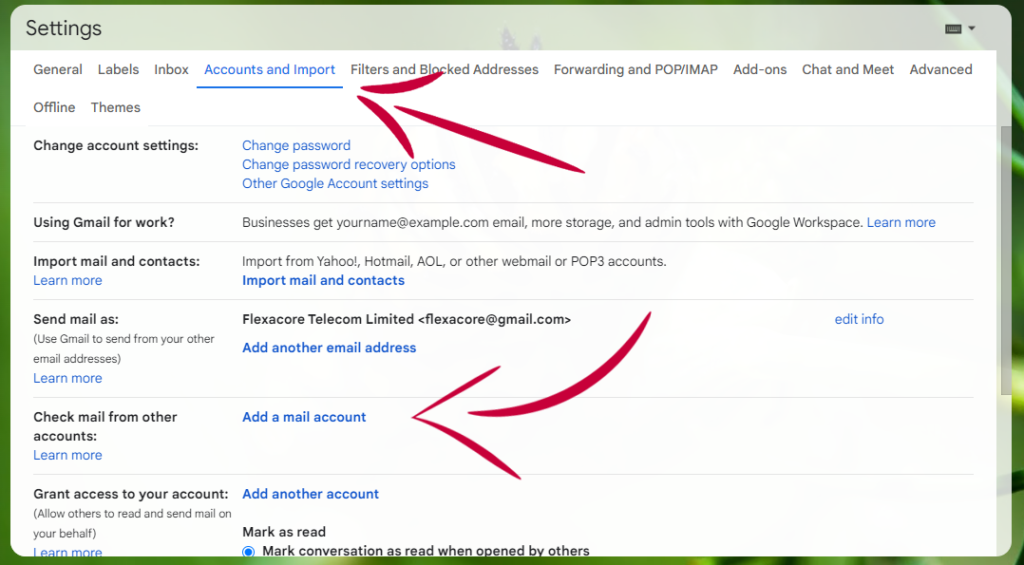
- Log into your Gmail account. From the upper-right corner of your screen click on Gear Icon to access “All Settings.”
2. Access “Accounts and Import” tab and click “Add a POP3 account.
 3. Enter the email you wish to check through Gmail. After clicking “Next,” a window will pop up asking for the username, password and POP3 server.
4. Check the box “Leave a copy of retrieved message on server” if you wish to always keep a copy of your emails on your work server.
5. Check the box “Label incoming messages” if you want all of your work emails to have a unique label that quickly identifies them as originating from your work email.
6. Click “Next” and a window will appear asking if you would like to send messages using your work email.
7. Click the box that says “Yes I want to be able to send email from.” The next prompt will ask for the name you wish to appear when you send email. Click “Next.”
8. You now have two options. First, you could route through Gmail servers. If you select this, you will need to send a verification and enter the code and the setup is complete. However, since this is a work email, it is advisable to send using your work domain servers.
9. If you opted to send through your work domain server, then enter the SMTP server and port number for the work email.
10. Enter the username and password for the work email and select either TSL or SSL for the secured connection. If TSL does not work, try the SSL. Some server connections do not support TSL. Select “Add Account.”
11. After the authentication is verified, a code will be sent to your work email. Log into your work email and retrieve the code and enter it into the Gmail settings. Be sure that you select the option to “Reply from the same address the message was sent to” under the “Accounts and Import” tab of Gmail settings.